Monday, January 9, 2012

Air brushing is AWESOME.

So, Christmas day arrives and I unwrap my present from my wife to find she has got me a dual action, internal mix air brush! Which is pretty cool, as I've been going about them right up to the point I found out how much they can cost! Since then my air brush and I have been starring at each, both in the knowledge that the time was approaching when I will have to have a go and use it to create 'artistic' modelling effects. This filled me with some intrepidation, given my normal inability to transfer the glorious image I have in my head, down my arm and into the paint brush, pencil or whatever where, as usual, it becomes some sort of childs drawing complete with stick figures next to a square house, all being overseen by a very yellow and smiley faced sun.

So this weekend the moment had arrived - I had the paints, I knew how to clean the air brush (essential!) and I was ready to go. For my first outing with my new tool I decided to paint clouds onto my backdrop. I read a few articles and watched a couple of videos on youtube to get the general gist of things. The clouds were for the winter sky, so they needed to be quite heavy (snow laden) but also I wanted some drama to them. After some practice I hit the layout for real. I started first with laying down a random medium grey to create the basis for the area by clouds would cover. Then, using a darker grey and a torn piece of paper as a loose mask I created the bottom of the clouds, which makes a sort of layered effect. I only held the mask lightly, and moved it a bit to make sure the lines didn't appear solid. Finally I changed to a light grey/white, and picked out the high lights at the top of the clouds, and underneath the dark layers that are on top to the other layers of clouds.

I finished off with some more touching up in places I wasn't happy with - places where I had misjudged my target area, or got the flow wrong. The beauty of airbrushing is that is dries very quickly, so adding more on top of what you have already painted is a simply affair.

And viola, here are the results...


I was so pleased with what I have done. Comparing it with what I've seen on other models I believe its not a bad job at all for someone who can't paint for toffee and has only just picked up an airbrush! But I must confess, I'm addicted to the airbrush now.

Whilst I was on a roll I decided to have a go at a simple bit of weather on my plastic peco tunnel entrances. I sprayed them over with a bit of medium grey and then got the black out and added some grime...


They still look a little flat, but not bad for 5 minutes work.

So here is Simon's top tips and advice... so far...

  •  Getting the paint mix is essential, too runny and it'll look uneven and runny on your medium, to thick and it won't spray well/at all. Mix seems to range from 1:1 to 2:1 paint to thinners ratio. Your thinning solution depends on your paint, with the acrylic paints I used it was just water. best to experment
  • Get some sealable containers to put your mixed paints in. I means you can mix enough paint at the right consistency and keep it, and its easily to hand when you need it.
  • Have something to test spray onto before you spare onto your medium proper - at least until you are used to the brush. I'm certainly not used to it.
  • Clean the airbrush IMMEDIATELY after use and learn how to do it properly. Using the acrylics I used (Revell Aqua Color) it was just a case of using water. Follow the manufactures cleaning instructions. Don't be scared of it though, it doesn't take long, and its not difficult to do properly.
  • Practice first with cheap paints and get used to how the paint flows through the airbrush.
  • Look up airbrushing tips and tricks on the internet, if you want to do something, some is bound to have done it before!

Sunday, September 4, 2011

Under the arches

And so to my final update of the week.

First of all the arches are finished, fix and lit. The "Gentleman's club" is now known as The Peppermint Hippo, a club for all the local gangsters and criminal elements to go to unwind after a busy day lawbreaking. Owned by a Mr George 'Hammers' Dale Esq, this seedy establishment features acts for the discerning gentleman that could only be described as "Gentleman's relish", with extras for those who can pay. But what ever you do, remember to pay your tab, or Georgie's boys will be paying YOU a little visit!


Unfortunately I put the sign on a little skew-wiff, so I had better fix that before Mister George sees it! You can also see the ramp has been smoothed out with a filler adhesive cement, and painted in.

I also bought some mounting card this week, colour called Porcelain, and cut out the backdrop from it. Even without painting it is an instant improvement.


Thursday, September 1, 2011

Thinking ahead

For some time I have been concerned that my idea for summer/beach scene, with the tracks coming straight out of a tunnel and along the sea front, wasn't very realistic. However, I recently saw a video of a perfect example of the kind of layout I'm going to model, at Dawlish in south Devon.


(*Image from Google Street View)


So all is well!

Wednesday, August 31, 2011

Let there be light!

Over the last few days I have also installed the lighting bus using a power jack mounted in the new side boarding and wiring under the board. To this I will wire my new 'warm white' 3mm LED's from an eBay seller.

So finally the time has come to start wiring the lights and placing the first buildings! First comes the station building. The first test with the lighting showed up a couple of problems I half expected... the light makes the walls glow ever so slightly, plus light comes out from underneath the buildings. Also, the bulb could be seen from through windows, which wasn't great. So, I made a cardboard mask for the inside of the buildings, cutting out the holes for the windows and door lights. I then covered those holes over with masking tape. This diffuses the light through the windows, and hides the unpainted insides and bulb from sight. Finally, I created a skirt for the bottom of the buildings, on the insides, out of black insulation tape. This seals the building against the platform.

The other mod I made to the building was to move the supporting poles in a bit, as they where on the edge of the platform. A nail has been placed in the platform to hold the poles in place.

And here are the results!


More tomorrow...!

Tuesday, August 30, 2011

Side boarding on

Today, and over the last couple of days I have made quite a few changes.

Firstly I have remove the tacked on beach section. Its not gone for good, but I'm going to turn it into a separate slot in module. This will make moving the layout a lot easier, and reduce the weight - it was getting heavy!

Then I added new handles underneath and new felt feet. Finally I added the side boarding to protect the sides of the layout, and to tidy up the appearance. The beach side is cut away to allow the module to connect with the main board.


The boarding is Tongue and Groove cladding, with is cheap and the perfect side. these will get a coat or two of glass at some point.

More tomorrow...

Wednesday, August 17, 2011

Station buildings

Last night I finished some station buildings. These ones have been built from Metcalfe kits, and I was impressed with how easy it was to build, given the arches I previously built were from scalescene.com (printable PDF kits) and as such are a lot more labour intensive and prone to mistakes/general untidiness!

That said, I still think the scalescene kits are excellent, with nice detailing, flexibility, great instructions, and excellent value for money! But for quick building times and tidiness, Metcalfe win hands down.


Metcalfe Models PN134 - Island Platform with Buildings. Excuse the poor photography!

When I can get at the railway again I'll place it, but at the moment I have this problem...!

Sunday, August 14, 2011

The arches

Been making some buildings for the town scene, so here is a work in progress of the arches, with shops underneath, and a road bridge. When I can get to the railway i'll place it!


*Edit - uploaded new photo...

Sunday, June 12, 2011

A rainy day, time for trains!

The first properly rainy day in about a bazillion years combined with no other plans means I am able to dust off the layout and do some more work on it!

So welcome to an update of several parts. Firstly, the ballast is down on the town side. I did in fact complete sticking this down about a month ago, but only today have I had chance to tidy it up, make sure it wasn't obstructing the rails. I seems in places I got the glue mix wrong and the ballast has come away when hovering. But I have other plans for the area in question anyway so I'll deal with that another day.

For the ballast I have used Woodland Scenics Fine Grey Blend. I originally used Buff coloured ballast in the same range, but I disliked it. The new ballast is much better.

To fix it in place I used 50:50 Copydex/Water solution with a few drops of washing up liquid. Copydex being a latex based glued. Firstly the ballast was CAREFULLY sprinkled onto the track, trying to make sure between each sleeper was filled, but not overly filled! (This I learnt from my first attempt - there is such a thing as to much ballast!) I then took my trusty miniature "Henry the Hoover" and sucked up the stray ballast around the edges of the track to create straight lines. Henry is invaluable when ballasting, every railway modeller should have one! Finally I took a pipette and carefully dripped the solution onto the ballast. This is when you realise how important the washing up liquid is as it helps the solution soak through the ballast more easily as it breaks the surface tension of the solution. Once applied leave to dry for at least 24 hours. Or in my case, a month :P

Using a latex glue over PVA seems to have a few advantages. The major advantage is that because it is rubbery you can peel it off the track and base board without it ruining either - excellent if you make a mistake! (...such as changing your mind about the colour! *ahem*) And from reading around it appears it does not colour your ballast as much as PVA can. The rubber also apparently softens the noise of the trains when running.

On the downside Copydex can be more expensive than PVA, and it has a slight odour of something close to cat pee when wet - it is thankfully odourless once dry!

Once the ballast is dry the track needs a thorough cleaning to ensure there is no debris stuck to the insides of the rails and between the blades of the points. One note of caution, always ensure your points will still operated before the glue dries.

Prior to ballasting I weathered the rails with a 'rusting' solution using Miniscenes Model's "Realistic Rust". It was an experiment and given the size to n gauge rails its not that noticeable, although on closer inspection it does make a difference... and where it is built up it looks quite effective.

So, after all the cleaning and fixing a few small power issues I finally tested the track. And I'm glad to say everything ran like a charm, including the steam locomotives, which have a habit of finding problems in the layout! For the full test I ran a goods train, usually the most troublesome of trucks, and it ran like a dream! All in all, I'm pretty pleased. The ballast needs weathering yet with soot and weeds and this will be done at some point in the future.

And so on to the loco fleet! I have two new additions. One is a Warship class diesel in maroon which I got for my birthday, and the second is a class 37 diesel in green which I have been waiting for Farish to release for ages! Both are late crest era. The warship isn't strictly the right region (its more south west) but I liked it so I don't care! :) Both are Graham Farish DCC plug and play loco's, and it seems someone at Bachmann/Farish have been listening to the consumers because the new Class 37 was very easy to get into to fit the chip!

An interesting side note with the DCC chips. When I got the Warship I got two Digitrax chips instead of the Bachmann chips. They seem to act very erratically, not responding to the controller sometimes when I change the speed and then suddenly changing speed later on. I have replaced them with Bachmann chips and the problem disappears. Its probably a configuration issue, but I have no idea what to do about it at the moment.

So, with out further ado, here are the obligatory photos of my latest work and the new loco's :)


Tuesday, May 10, 2011

More little trains...

Real ones this time! Any holiday to Wales wouldn't be complete without a ride on one of the numerous narrow gauge railways! So last week we picked the one rainy day to travel on the Vale of Rheidol Railway from Aberystwyth to Devils Bridge. And here are the snaps!
These were all taken at Devils Bridge.


Sunday, May 8, 2011

Buff part 2

Just rang the shop, and no, they don't have it in stock. To be honest they never seem to have anything in stock!

In the buff

Have spent half the day today putting down ballast on the Yuletide side of the track. This was the first ballast to go down and also the first ballast to come up. My gut instinct was to use granite grey ballast, but when the shop I went to didn't have it in bulk I decided to try Woodland Scenices fine Buff instead. I should have stuck to my gut feeling. Whilst it looked ok when I did a sample (ok-ish... I convinced myself) as more of the track was covered the more I disliked it. It went a little orangey and looked more and more like sand... exactly the look I didn't want.

I did a little research into ballast colours and if I had been modelling GWR I might have got away with it. As it is I am modelling Midlands/North east and it just looked wrong.

I have tried to remedy the situation with a grey paint wash but the effect was not great. So the final solution is to take up the ballast I have put down so far and start again. Thankfully I used a latex based glue (Copydex) to stick the ballast which makes taking it up a lot easier!

So the next job is to source some fine/extra fine granite grey chippings. Hopefully my local n gauge shop is open tomorrow and for once is stocking the items I want!

Monday, March 28, 2011

It's progress Jim, but not as we know it.

It's been a slow month on the model railway front all in all. All the other jobs around the house and garden, plus a busy time generally and the death of my Granddad have all absorbed my time and energy.

But still I have managed to get a few things done. Firstly I have fixed the problem on the fiddle yard and the trains now pass each other without clipping. Secondly, I have ripped up the town level ready for putting back in AT THE CORRECT SCALE height! Thirdly I have cut a new backboard to separate the fiddle yard from the layout.

I had trip to the Nottingham Model Railway Fair the weekend before my birthday where I managed to get an early birthday present in the form of a new loco - a Class 42 Warship in Maroon called Hermes (Graham Farish) - late 50's early 60's era. Strictly speaking it is not the correct region in comparison to the other loco's in the fleet, which caused much ummming and arrring about whether to get it. Then I remembered I liked it and didn't care that much... and it was the right era anyway! It looks great with my rake of chocolate and cream coaches. It's been fitted with a Digitrax 6 pin chip. Fitting of this diesel was a much easier affair than the Class 108 DMU (which is still functioning by the way). However, the loco does seem to exhibit some erratic behaviour sometimes, especially when the speed is changed gently. Sometimes there seems to be a lag between commands taking affect, even with regards turning on and off the lights. I can say I ever noticed this with the Bachmann chips but then again, I never saw the momentum effect using Bachmann chips either and its definitely evident with the Digitrax chips. I think I need to look into programming the chips to different settings. I will experiment with a Bachmann chip at some point to see if the problem goes away.

Speaking of Bachmann chips, good old Rails of Sheffield have continued their excellent customer service and will replace the blown chip once they have more in stock. Plug and play chips should not blow.

And now, bed....

Wednesday, March 9, 2011

Track testing, the DMU fry-up and other mistakes

Tested the track this weekend, uncovered one problem in that I have put the two main tracks too close in one section of the fiddle yard (I did wonder, but I hoped I was wrong!)


My solution (I hope) will be to ease the outer curve out. The other solution would be to make the inner curve tighter, but a, I don't want any more tight curves, and b, I'd have to cut more cork, and its rather neat at the moment!

A part from that little issue the new look fiddle yard is a success! Even the radius one curve into the station sidings works nicely. In spite of its tightness all the locos traverse it with ease. It may not look pretty but, hey, its a fiddle yard, so who cares?!

I've also started on making space on the fiddle yard board for controllers and (eventually) transformers (and possibly switches?) to control and power the layout. When I say start, I mean I drilled a hole in the base board and frame to feed through the power cables and wiring to the track! Small acorns and all that...

And onto the DMU... The DMU dummy car's lights had stopped functioning. I assumed this may be a loose connection, but in fact I found that the Bachmann DCC decoder had died. I replaced it with another from a different loco and hey presto it lit up again.... sort of - during the period when the shell was off the lighting was changing colour randomly and flicking on and off and the merest movement. I put the shell back on and thankfully it did settle, but I'm now wondering if the dummy car has a short somewhere that fired the chip.

Anyway, I am now looking at getting a new chip, and I have been recommended to get a TCS or Lenz chip due to the excellent manufactures guarantee. Its like my mother always says, buy cheap, buy twice!

Other mistakes...

I have realised my judgement of scale for n gauge is way off in some cases. Take the upper town level for example, its far too high, about twice the height it should be. So that is the thing to be changed, along with the fiddle yard back scene as I have changed my mind about the dual hieght look, and the portals are far to big.

Monday, February 28, 2011

Next time, do it properly!

This weekend I decided to change the fiddle yard area. The original was a bit of a bodge job... for starters I used 6mm MDF instead of 9mm that I used on the main board. This required me to build up a massive amount of cork underlay and also exasperated the difference in height which occurred from one end of the loop to the other.

The other issue I had was the inner siding and points combination. This combined with changing heights caused all sorts of problems with the locos - bad connections, derailments etc. It basically meant the siding was useless.

I removed all the track and cork from the board and then removed the board entirely, replacing it with a equal sized piece of 9mm MDF.

I then laid a single piece of cork sheet, with extra height on beach side as the attached extension board on that side is a millimetre or so higher.

The outer loop and siding was relaid as before. However the inner loop has undergone a transformation. The inner siding is now a complete loop, and the complication siding junction as gone and the siding feeds directly into the 3rd platform at the town side station from a a new curved point from the other side of the fiddle yard.


Whilst the outer loops are all radius two or great I have had to compromise with the inner most loop, using radius one curves. As the original inner siding was also radius one I don't see this as backward step, although its not necessarily a satisfactory solution either. But given the space it really is the only solution!

All the wiring has been redone (mostly reused, I only had to solder one more wire!) and connected, and the next step is to test the circuit and the locos for reliability.

New track plan...

Friday, February 4, 2011

Town Plan

A quick mock up of the town as currently planned in my head.

Upper town level

Last weekend I put on the upper town level for the scenery, along with fixing the backdrop separators in place. I also added a layer of cork to raise the platforms to the correct level. I'm not overly happy with fit of the platforms against the track - I'm not sure what happened between me measuring the platform sizes and placing them but with a little bit of hammer persuasion on the track it fits a little better now.


Seemed to have made a mistake (maybe) in the sizing of the upper town section as the narrow bit along the middle is a little too thin for my liking. Last time I guestimate!

Saturday, January 29, 2011

Yay!

Loft ladders installed! Woo hoo!

Tuesday, January 25, 2011

More platforms

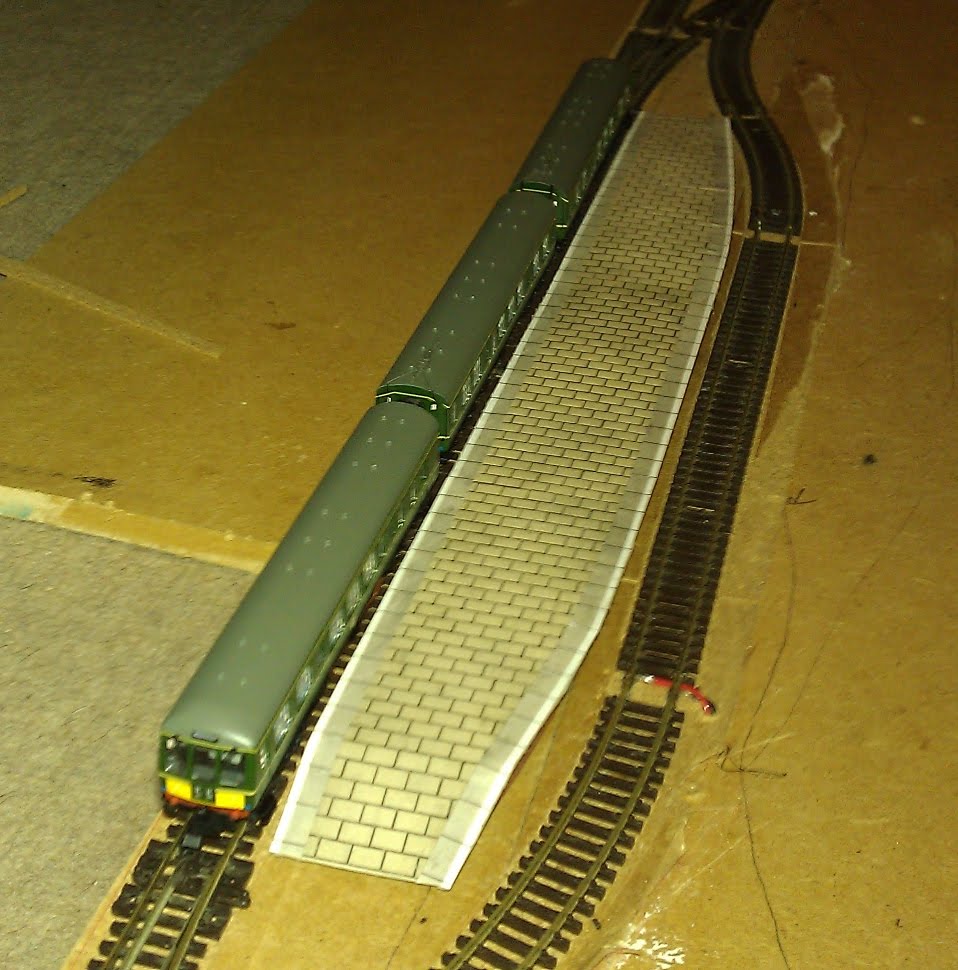
Something I have realised doing this project already is that I should have made the platforms first BEFORE I laid the track. First of all, it was more difficult to trace the shape of the platform onto a template to get the platform shape. Secondly, I seemed to have got a very odd platform shape... thinner at one end than the other, and not entirely straight. I have actually gone and straighten the track and platform after finding this. I got around the template by drawing the platform shape onto the board directly and then using grease-proof paper as tracing paper to copy the shape and make the template.


This time I was much quicker at building the platforms for the town station. I also decided to use the standard concrete board the supply in the kit. The instructions supplied with the kit are decent enough, although this is a simple kit. The part about drawing the platform template using a felt tip pen attached to a piece of rolling stock such as a coach was invaluable, although probably obvious to the seasoned model builder!

And here are the finished articles, although they have yet to make it onto the layout.


To be honest, before I started with the Metcalfe kit I had by doubts about how they were going to look, but in truth I'm fairly impressed with the outcome. I have now got two more kits to construct for the town platform buildings - and they are a lot more complicated!

Monday, January 24, 2011

Backboards and platforms

As the title suggests, I have put in the backboards and built my first platform.


The backboards have been trimmed down to be the same height, and also low enough to go under the bed for storage. The town side has a two level effect. I have a few ideas for that but I'm not sure If I will utilise it yet. The main idea is that as this area is a bridge the other side will have no background - the scenery is left open.


I have built my first platform (ever) from a metcalfe kit which I modified by adding metcalfe self adhesive paving sheets instead of the standard concrete grey board they supply. Incidentally, it seems that the Metcalfe self adhesive items are not very sticky, so it all required a dab of PVA glue to help it stick. I also found that it helped if I carved away the backing of the brick walls under the platform to leave a tiny brick paper flap that covered the grey card ends of any joining walls and thus improve the look. All in all I'm pretty happy with my first attempt! I will look at some point into how I can darken and weather slabs on the platform more - I was thinking I could mix some sort of thin paint wash to paint over it. More research needed here.


The platform also stands too low on its own, so needs a layer of cork underneath when placed.


Other improvements include trimming and tidying the cork underlay as well.

And finally, just to make sure all work is carried out satisfactorily, the site foreman - erm, cat - Sox is on hand to oversee the work!


More importantly, you can see the two poles behind her, and the reason why I had to cut a hole in my beach!

Thursday, January 20, 2011

Strange Santa


For Christmas my darling wife bought me a Noch illuminated Christmas tree for the winter side. It's going to look great, but I wasn't expecting the strange little figure that came with it.


I just can't decide if it is a Santa Claus, a Priest or a festive member of Kraftwerk ;)

Answers on a postcode...